



100 Best AI Photo Editing Prompts to Transform Your Photos in 2026
AI photo editing has moved beyond one-click filters. Modern image editors can remove distractions, replace backgrounds, restore damaged photographs, improve lighting, expand a canvas, change clothing, clean up product images and create controlled creative variations. The difference between a useful edit and a strange result often comes down to how clearly the prompt defines the requested change and what must remain untouched.
The strongest AI image editing prompts work like concise editing briefs. They identify the subject, specify the exact change, define how the new result should match the original image and protect important details. Photoshop currently supports Generative Fill, Generative Expand, Generate Background, Generate Similar and Reference Image workflows, while current AI photo-editing tools increasingly support localized natural-language edits.
This collection contains 100 copy-paste AI photo editing prompts for portraits, selfies, professional headshots, background replacement, object removal, photo restoration, lighting, color correction, product photography, fashion, travel, food, interiors, social media and creative edits. Replace bracketed placeholders with details from your own photo and upload the source image first whenever the editor supports image editing.
QUICK ANSWER
The best AI photo editing prompts are precise about what should change and equally precise about what should stay the same. Instead of saying “make this photo better,” describe the exact edit, the area affected, the lighting or perspective match and the protected details. A good background-removal prompt asks the editor to remove the unwanted person, reconstruct the scene naturally and preserve the main subject’s face, clothing, pose and composition.
The 100 prompts below cover portrait retouching, AI headshots, background replacement, object removal, old photo restoration, AI photo enhancement, product photography, fashion edits, social-media resizing, travel photos, food photography and creative photo manipulation.
These templates are designed to be reusable in Gemini, ChatGPT image-editing workflows, Photoshop and other AI photo editors that accept natural-language instructions. Photoshop currently supports selection-based Generative Fill, Generative Expand and reference-image guidance.
My recommendation: make one major edit at a time, explicitly protect identity and text, and review the final image for faces, hands, logos, reflections, shadows and small artifacts before publishing.
The AI Photo Editing Prompt Formula
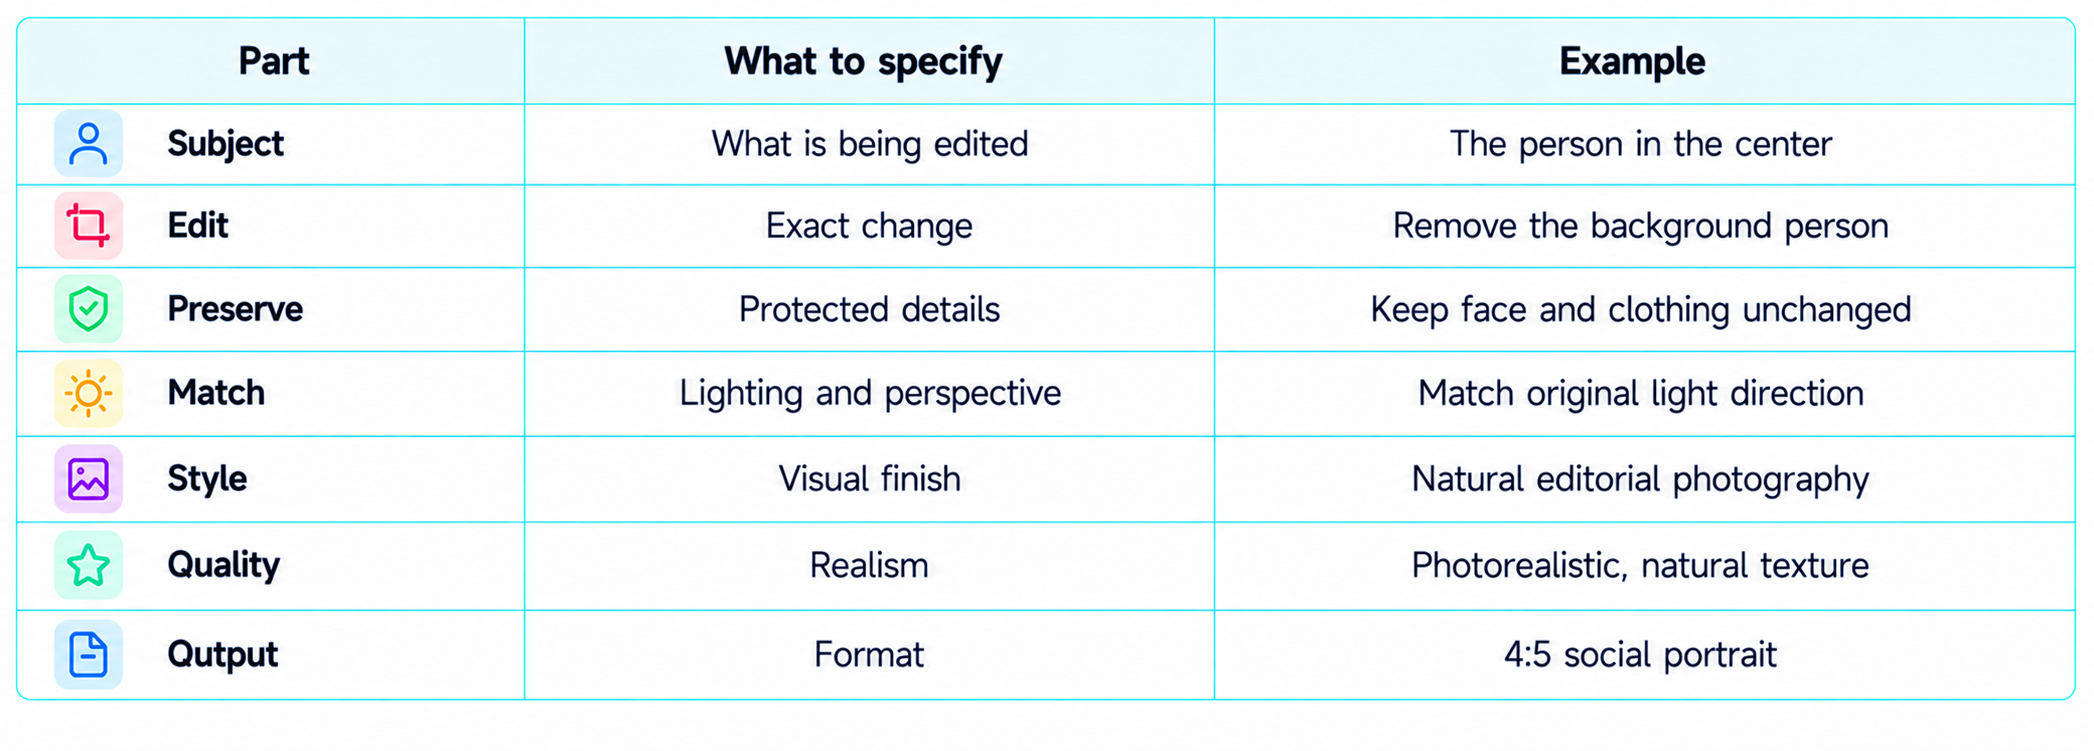
A reusable template is: “Edit this photo by [change]. Preserve [important details] exactly. Match the original [lighting/perspective/color/texture]. Keep the result photorealistic and natural. Do not change [protected details].”
How to Use These Prompts
- Upload the original photo first whenever the editor supports image editing.
- Replace bracketed placeholders with details specific to your photo.
- Describe one major edit at a time when precision matters.
- Protect identity, face shape, logos, labels, clothing, framing and important objects explicitly.
- For added objects, describe scale, perspective, light direction and contact shadow.
- For restoration, ask for conservative repair and preservation of the original character.
- Review faces, hands, text, reflections, object boundaries and shadows before publishing.
Portrait Retouching & Selfies
1. Natural Portrait Retouch
Retouch this portrait naturally. Remove temporary blemishes and uneven redness while preserving pores, freckles, facial lines, face shape, expression and identity. Keep hair, clothing and background unchanged.
2. Clean Skin Without Plastic Texture
Improve skin tone subtly and remove only temporary imperfections. Preserve pores, freckles, fine lines and natural facial texture. Do not reshape the face or change the person's identity.
3. Brighten Eyes Naturally
Slightly improve eye clarity and brightness while preserving exact eye shape, color and natural texture. Reduce mild redness without changing the expression.
4. Reduce Under-Eye Shadows
Reduce under-eye darkness and fatigue naturally while preserving facial anatomy, skin texture and the original light direction.
5. Natural Teeth Enhancement
Brighten visible tooth staining slightly while preserving natural tooth shape, lips, jawline and expression. Avoid an artificial white effect.
6. Improve a Selfie Camera Look
Polish this selfie by correcting exposure, white balance and minor lens distortion. Preserve face, hair, clothing, pose and natural skin texture.
7. Editorial Portrait Polish
Give this portrait a refined editorial finish with controlled contrast, accurate skin tones and subtle retouching. Preserve identity and facial structure.
8. Hair Detail Enhancement
Improve hair definition and reduce distracting flyaways while preserving hairstyle, color, face, clothing and background.
9. Remove a Temporary Blemish
Remove only [blemish/spot] from the face and reconstruct the nearby skin naturally. Preserve pores, facial structure, identity and expression.
10. Natural Professional Selfie
Make this selfie look like a professionally captured portrait. Improve lighting and clarity while keeping the person's appearance authentic and recognizable.
Professional Headshots & Business Photos
11. LinkedIn Headshot
Turn this photo into a professional LinkedIn headshot. Preserve exact identity, face, hairstyle and clothing. Use clean neutral lighting and a subtle studio background.
12. Corporate Headshot
Create a polished corporate headshot with soft professional lighting and a neutral background. Keep facial features, expression and proportions unchanged.
13. Resume Photo
Prepare this portrait for a professional resume. Improve exposure and clarity, use a clean understated background and preserve the person's natural appearance.
14. Executive Portrait
Create an executive portrait with refined studio lighting and restrained retouching. Preserve identity, face shape, hairstyle and clothing.
15. Company Directory Photo
Standardize this portrait for a company directory. Keep the subject unchanged while using even lighting and a clean neutral background.
16. Speaker Bio Headshot
Turn this image into a professional speaker-bio portrait. Preserve identity and expression and use subtle editorial lighting.
17. Neutral ID-Style Portrait
Create a simple official-looking portrait with even lighting and a plain background. Do not beautify, stylize or reshape the person.
18. Clean Office Background
Replace only the background with a modern professional office. Match perspective and lighting while leaving the person untouched.
19. Studio Background Headshot
Replace the background with a softly lit studio backdrop. Preserve subject edges, face, clothing and hair details.
20. Consistent Team Headshot
Make this portrait match a professional team-photo style with consistent background and lighting. Preserve the person's exact identity.
Background Replacement & Cleanup
21. Light Gray Studio Background
Replace the background with a seamless light-gray studio backdrop. Preserve the main subject exactly and add realistic contact shadows.
22. White Background
Replace the background with a clean white studio background. Preserve subject edges, proportions, lighting and natural shadows.
23. Modern Office
Replace the background with a modern office and match the original perspective, depth of field and light direction.
24. Outdoor Park
Replace the background with a realistic green park. Preserve the subject, pose, clothing and original lighting direction.
25. Luxury Interior
Replace the background with a tasteful luxury interior. Match subject scale, perspective, lighting and depth of field.
26. Beach Background
Place the subject on a believable beach scene. Preserve the person exactly and match sunlight, shadows and color temperature.
27. Sunset Background
Replace the sky and background with a warm sunset while preserving the subject and foreground. Match reflections and ambient light.
28. Remove Tourists
Remove all distracting tourists from the background and reconstruct the location naturally. Keep the main subject unchanged.
29. Remove Photobomber
Remove the unwanted person behind the subject and rebuild the background using matching texture, perspective and shadows.
30. Clean Busy Background
Simplify the background by removing only distracting objects while preserving the main subject and important environmental details.
Object Removal & Replacement
31. Remove Table Object
Remove [object] from the table and reconstruct the tabletop and shadows naturally. Preserve everything else.
32. Remove Street Sign
Remove the selected sign and reconstruct the wall or street background with matching perspective and texture.
33. Remove Cable
Remove the visible cable and reconstruct the surface underneath naturally. Keep all other objects unchanged.
34. Remove Trash Bin
Remove the trash bin from the scene and reconstruct the ground and background realistically.
35. Remove Distracting Pole
Remove the pole and rebuild the background behind it while preserving architecture and lighting.
36. Replace Chair
Replace the selected chair with a [style] chair. Match scale, perspective, material, lighting and contact shadow.
37. Replace Bag
Replace the selected bag with [bag]. Preserve hand position, pose, clothing and realistic fabric interaction.
38. Replace Product Object
Replace the selected object with [object]. Match size, perspective, surface reflections and shadows.
39. Remove Person
Remove only the selected person and reconstruct the scene naturally. Do not change other people or the main subject.
40. Clean Multiple Distractions
Remove only these distractions: [objects]. Preserve all unrelated people, products, architecture and composition.
Lighting, Color & Exposure
41. Fix Underexposure
Correct the exposure and recover shadow detail while preserving the original mood and color.
42. Fix Overexposure
Recover detail in bright areas without making the overall image too dark. Preserve skin tones and scene colors.
43. Correct White Balance
Remove the unwanted color cast and restore neutral, accurate color while preserving the original atmosphere.
44. Golden Hour
Transform the lighting into believable golden-hour sunlight with warm directional light and realistic long shadows.
45. Soft Studio Light
Convert the lighting to soft professional studio light with gentle fill. Preserve subject, background and realistic skin texture.
46. Cinematic Color Grade
Apply a restrained cinematic color grade with richer contrast and controlled highlights. Keep skin tones natural.
47. Bright Editorial Grade
Give the image a bright editorial finish with clean whites, soft contrast and realistic colors.
48. Reduce Harsh Flash
Balance harsh direct-flash highlights and shadows while preserving facial features and scene detail.
49. Improve Indoor Lighting
Balance mixed indoor lighting and window exposure while preserving furniture, skin tones and true colors.
50. Match Edited Lighting
Make the edited object match the original scene's light direction, color temperature, shadow softness and exposure.
Photo Restoration & Enhancement
51. Restore Old Photograph
Restore this old photograph by removing scratches, dust, stains and tears while preserving identity, clothing, composition and historical character.
52. Repair Damaged Portrait
Repair damaged areas and reconstruct missing details conservatively. Do not modernize the face or clothing.
53. Remove Film Scratches
Remove scratches and dust while retaining authentic film grain and natural photographic texture.
54. Restore Faded Colors
Restore faded colors and contrast naturally without adding modern saturation or changing the scene.
55. Sharpen Soft Photo
Improve clarity in this soft image while preserving natural texture and avoiding halos or artificial edges.
56. Reduce High-ISO Noise
Reduce digital noise while preserving hair, skin texture, fabric and small details.
57. Improve Low-Light Photo
Brighten this low-light photograph, reduce noise and recover shadow detail while keeping the original nighttime mood.
58. Upscale Portrait
Upscale this portrait while preserving face shape, identity, hair, skin texture and clothing detail. Do not invent a new face.
59. Restore Family Photo
Restore this family photo while preserving each person's identity, expression, clothing and original composition.
60. Repair Torn Photo
Repair visible tears and missing areas using surrounding visual information. Keep the original people, objects and era-specific appearance.
Crop, Expand & Composition
61. Expand to 4:5
Expand the image to a 4:5 portrait format. Continue the background naturally and preserve the subject's position, scale and appearance.
62. Expand to 16:9
Expand the image to 16:9 landscape by generating believable continuation at the sides. Match perspective and lighting.
63. Expand to 9:16
Expand vertically to 9:16 for a social story. Preserve the subject and extend the environment naturally.
64. Add Left Negative Space
Create clean negative space on the left for headline text. Preserve the subject and original visual balance.
65. Add Right Negative Space
Create clean negative space on the right for text while keeping the subject and lighting unchanged.
66. Square Crop
Prepare the image for a 1:1 square crop using the smallest necessary crop. Preserve the subject and key context.
67. Fix Cropped Hair
Reconstruct the missing portion of hair and head naturally using visible features as reference. Preserve identity.
68. Reconstruct Cropped Product
Reconstruct the missing edge of the product so its full shape is visible. Match perspective and material.
69. Straighten Architecture
Correct vertical lines and mild lens distortion while preserving building proportions and perspective.
70. Improve Composition
Make the smallest possible crop or alignment adjustment to improve composition. Do not change the subject or scene.
Product & E-Commerce Photography
71. Clean E-Commerce Product
Create a clean e-commerce product image with an uncluttered background and soft contact shadow. Preserve product shape, logo and labels.
72. White Background Product
Place the product on a pure white background with a realistic grounding shadow. Preserve edges, branding and colors.
73. Luxury Product Ad
Create a premium product advertisement with elegant studio lighting and controlled reflections. Preserve the exact product.
74. Remove Product Glare
Reduce distracting glare without changing product geometry, materials, logo or label.
75. Improve Package Readability
Improve package clarity while preserving the exact wording, logo placement and package design. Do not invent text.
76. Lifestyle Product Scene
Place the product naturally in a [kitchen/desk/living room] while preserving its proportions, branding, perspective and material.
77. Cosmetics Campaign
Turn this cosmetics shot into a premium beauty campaign. Preserve packaging text, bottle shape and product color.
78. Marketplace Main Image
Prepare this product for an online marketplace main image. Clean the background, center the product and preserve its exact appearance.
79. Product Flat Lay
Create a polished flat-lay composition around this product. Preserve the exact product, packaging and branding.
80. Commercial Product Polish
Correct exposure, white balance, clarity and background distractions without changing product geometry, labels or branding.
Fashion, Beauty & Lifestyle
81. Change Outfit
Change the subject's clothing to [outfit]. Preserve face, identity, body proportions, pose, hands, hairstyle and background.
82. Change Clothing Color
Change only the clothing color to [color]. Preserve fabric texture, folds, logos and every other detail.
83. Editorial Fashion Look
Give the subject a refined editorial fashion look with [style]. Preserve identity, pose and body proportions.
84. Fashion Studio
Place the subject in a premium fashion studio. Keep face, pose and clothing unchanged and match lighting and floor shadows.
85. Streetwear Editorial
Create a modern streetwear editorial while preserving the person's identity and important clothing details.
86. Beauty Campaign
Turn this portrait into a refined beauty campaign image with soft diffused light and subtle retouching. Preserve pores and facial structure.
87. Jewelry Enhancement
Improve jewelry clarity and highlights while preserving its exact design, placement and material.
88. Change Hairstyle
Change the hairstyle to [style] while preserving the person's face, identity, expression and proportions.
89. Add Sunglasses
Add [sunglasses] and match perspective, reflections and shadows. Keep the face and clothing unchanged except where naturally occluded.
90. Remove Accessory
Remove [accessory] and reconstruct the hair, skin or clothing underneath naturally. Preserve everything else.
Travel, Food, Interiors & Social Media
91. Travel Photo Enhancement
Polish this travel photo for social media with natural color, balanced exposure and clearer detail. Preserve the real location and subject.
92. Remove Background Tourists
Remove distracting background tourists and reconstruct the location naturally. Keep the main subject unchanged.
93. Sunset Travel Edit
Enhance the sunset subtly while preserving realistic gradients, landscape detail and natural colors.
94. Beach Cleanup
Remove [objects] from the beach and reconstruct sand, water and shadows naturally.
95. City Night Enhancement
Improve this city-night photo by reducing noise and balancing neon highlights while preserving real architecture.
96. Cafe Lifestyle Edit
Give this cafe image a premium lifestyle-editorial finish with natural light and realistic color. Preserve people and surroundings.
97. Instagram 4:5
Prepare this image for Instagram in a 4:5 format using crop or expansion. Preserve the subject and important details.
98. Instagram Story 9:16
Prepare this photo for a 9:16 story by expanding the canvas naturally and keeping the subject safely framed.
99. Restaurant Food Photo
Enhance this food image for a restaurant menu. Improve exposure, color and texture without changing the dish or adding ingredients.
100. Final Professional Polish
Give this photo a final professional polish for publication. Correct exposure, color, clarity and small distractions while preserving identity, text, logos, composition and realistic texture.
How to Make AI Photo Edits Look More Realistic
The best image editing prompts describe the visual relationships that make an edit believable. When adding an object, mention its scale, camera angle, depth of field, contact shadow and reflected light. When removing an object, ask the editor to reconstruct the surrounding surface rather than blur the area.
For identity-sensitive edits, preservation language matters. State that face shape, identity, expression, hairstyle and natural skin texture must remain unchanged. For commercial photos, protect logos, labels and packaging text because generated typography can change unexpectedly.
Reference images add another layer of control. Adobe’s current Photoshop documentation supports Reference Image for style and composition and lets reference images guide Generative Fill and image generation.
Prompting is not a guarantee of perfect pixels. Inspect text, logos, hands, reflections, repeated patterns, shadows and edited boundaries before publishing.
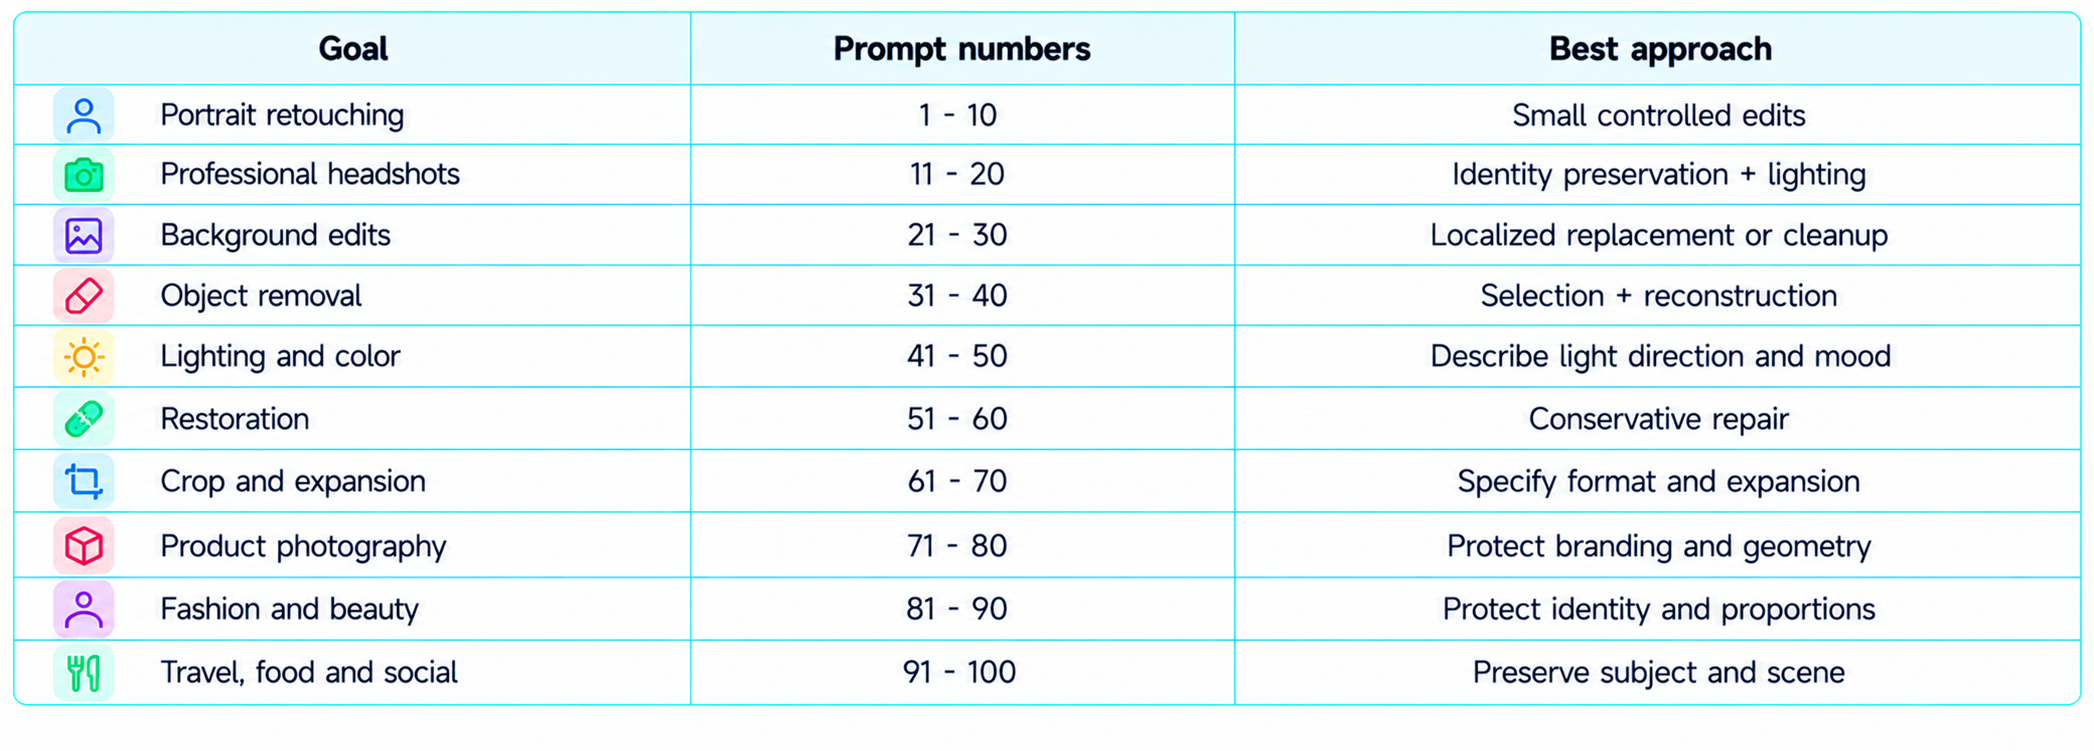
Best AI Photo Editing Prompts by Goal
Frequently Asked Questions
What are the best AI photo editing prompts?
The strongest prompts specify the exact edit, protected details, lighting or perspective requirements and desired realism.
Can I use these prompts with Gemini?
Yes. They are reusable natural-language editing templates. Exact image-editing features depend on the Gemini model and interface.
Can I use these prompts in ChatGPT?
Yes. They can be adapted to image-editing workflows that accept an uploaded photo and natural-language instructions.
Can I use these prompts in Photoshop?
Yes. Many are suitable for Generative Fill, Generative Expand and reference-image workflows.
How do I preserve a person’s face during AI editing?
Tell the editor to preserve identity, face shape, proportions, expression, hairstyle and natural skin texture, and keep the requested edit localized.
What is a good background replacement prompt?
Specify the new background and ask the editor to preserve the subject and match perspective, lighting, depth of field and contact shadows.
How do I restore an old photo with AI?
Describe the damage to repair and explicitly protect identity, clothing, composition and the historical character of the photograph.
How do I make an AI edit look realistic?
Describe scale, perspective, light direction, color temperature, shadows, reflections and texture.
Can one prompt work in every AI image editor?
The basic wording can be reused, but image editors differ in their selection, reference and generation controls.
What should I check after an AI photo edit?
Check faces, hands, text, logos, reflections, shadows, object edges and repeated patterns before publishing.
Recommended Blogs
Google Pics Review: Features, Price & Is It Worth It? (2026)
Best AI Video Models 2026: Ranked by Quality, Speed, Price & Use Case
Claude Fable 5.1 Review: Benchmarks, Pricing, Features & Is It Worth It? (2026)
Gemini 3.8 Flash Review: Accuracy, Price & Is It Worth It? (2026)
Resources & Community
Join our community of 70,000+ AI enthusiasts and learn to build powerful AI applications. Whether you’re a beginner or an experienced developer, Build Fast with AI helps you understand and implement AI in your projects.
Agentic AI Launchpad 2026
A structured 6-week cohort program that takes you from AI basics to building and deploying real-world agentic AI systems. Includes live sessions, expert mentorship, project reviews and a builder community network.
Ready to go from learning to building? Join the next cohort: Agentic AI Launchpad 2026
Free AI Resources
Access free tools, workshops and micro-learning to keep building.

